In the world of landscaping, retaining walls are more than mere functional structures; they are a defining aesthetic element that can transform your outdoor space. However, beyond their visual appeal, the importance of building a retaining wall that’s truly durable cannot be overstated. A durable retaining wall not only enhances the beauty of your landscape but also provides critical support, preventing soil erosion and maintaining the integrity of your outdoor area. It’s this balance of form and function that makes DIY retaining walls an essential feature for any homeowner who values a stable and visually pleasing environment.
In this comprehensive guide, we will walk you through the step-by-step process of building a durable retaining wall using interlocking landscaping blocks, ensuring that your project is executed with precision and expertise.
Essential Equipment For Building A Retaining Wall
Before delving into the construction process, it is crucial to ensure that you have the necessary tools and materials at your disposal. Here’s a list of essential equipment recommended by Strong Lock:
Tools:
- Metal rake
- Spade shovel
- Flat nose shovel
- Digging bar (for hard-packed rocky soil)
- Pickaxe (optional)
- Wheelbarrow
- Torpedo Level
- Standard level (opt for longer lengths for greater accuracy)
- Line Level (for improved precision)
- Mason line
- Measuring tape
- Stakes (wood or steel)
- Caulking gun
- Rubber mallet
- Mini sledgehammer
- Mason’s Chisel
- Hand tamper or plate compactor
- Safety Equipment
- Gloves
- Eye protection
- Earplugs
- Knee pads
Materials:
- Retaining Wall Blocks
- Construction Adhesive (1-2 tubes, depending on the project scale)
- Paver Base (quantity varies based on wall size)
- 3/4″ rough gravel for drainage
- Leveling Sand (1 bag is typically sufficient)
Step-By-Step Guide To Building A Retaining Wall
Now that we are well-versed with the tools and materials, keep reading the guide for a step-by-step procedure to build a durable retaining wall:
Step 1 – Dig a Trench
Start the process by marking the exact location of your wall, ensuring a trench width of approximately twice the depth of the blocks. The trench depth should accommodate at least six inches of packed gravel base material and half of the block height. Ensure the trench is level and accurately aligned.
Step 2 – Pack and Even Out The Gravel Base Material
To establish a strong foundation, lay down a six-inch packed gravel base. For shorter walls, a four-inch base may suffice. Follow your local block supplier’s guidance on base depth and meticulously pack each layer to ensure stability.
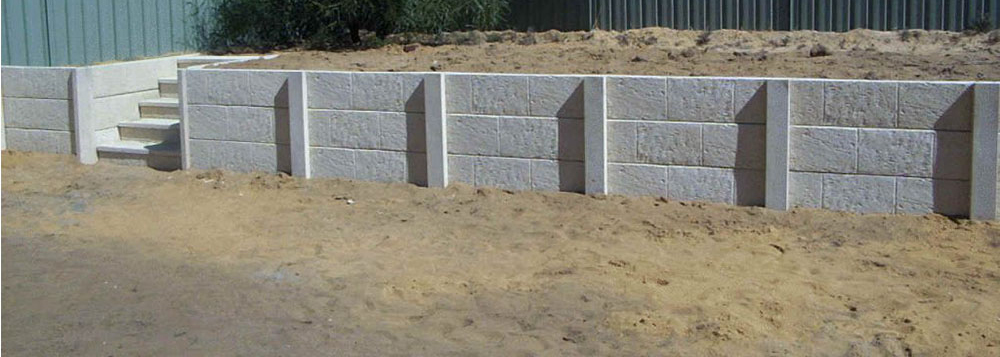
Step 3 – Place the Initial Row of Blocks
Starting at one end of the wall, install the first row of blocks, ensuring they are level both horizontally and vertically. Utilise a hammer and mason’s chisel to create a flat base for each block, facilitating ease of installation.
Step 4 – Now Add 3/4″ Rough Gravel Behind the Initial Row
Integrate 3/4-inch coarse gravel behind the initial block row, as this will improve the drainage system. Carefully pack the gravel and backfilled soil to secure the blocks in place.
Step 5 – Set Up the Subsequent Block Layers
Continue adding subsequent layers of blocks, ensuring a snug fit and staggering the seams to promote structural integrity. Clear any debris or dirt between rows to maintain a level surface.
Step 6 – Secure the Top Row of Blocks with Construction Adhesive
Stability is a must when it comes to building a strong panel and post retaining wall. Thus, for added stability, apply construction adhesive to the top row of blocks, effectively binding the structure. It is recommended to use construction adhesive primarily for the top row, with additional application depending on the size and type of blocks used.
Step 7 – Backfill with Soil After Final Layer
Upon completing the final layer, backfill the gap behind the blocks with soil, providing a polished appearance and facilitating potential landscaping endeavours.
Guidelines For Cutting Retaining Wall Blocks
There might be some cases where adjustments must be made, and in such cases, you need to follow these recommended methods for cutting retaining wall blocks:
Cutting Method 1 – Chisel and Hammer
Mark the block’s cutting line and use a masonry chisel and mini sledgehammer to create a groove. This will allow precise splitting.
Cutting Method 2 – Angle Grinder
Utilise an angle grinder equipped with a diamond blade to facilitate a smoother cutting process. To make the cutting process a breeze, ensure to mark the cutting lines before beginning with the cutting process.
Cutting Method 3 – Concrete Cutter
Consider renting a concrete cutter for larger cutting tasks, enabling a more efficient and precise cutting process.
Constructing A Retaining Wall On A Hill Or Slope
Constructing a retaining wall on a hill or a slope is not the same as constructing it on a flat surface. Therefore, when constructing a retaining wall on a hill or slope, it is vital to follow specific guidelines to ensure stability and structural integrity.
- Implement a stepped design, enabling the blocks to be perfectly level while accommodating the slope.
- Incorporate a paver base at each tier, ensuring a strong foundation for each row of blocks.
- Plan the grading around the retaining wall to facilitate proper drainage and prevent water-related issues.
Effective Planning And Design For A Successful Retaining Wall
Having a plan and design in hand is crucial for a successful retaining wall project. Thus, to ensure proper planning and execution, take a look at the recommendations below:
- Evaluate the surrounding features to establish a cohesive landscape design that aligns with your vision.
- It is important to handle waste wisely and thus, devise a comprehensive dirt management strategy to minimise wastage and streamline the construction process.
- Understand local regulations concerning wall height, permits, and structural engineering requirements, especially for walls exceeding three feet in height.
- Consult with local landscaping block suppliers to select the most suitable blocks for your project.
- Ensure that you prioritise proper grading to ensure efficient water drainage, thereby preventing potential water-related issues.
Transform Your Landscape with Strong Lock
Having a durable retaining wall means saving a considerable amount of money in the long run. With the insights and techniques we have provided, you can create a lasting and beautiful retaining wall that enhances both the practicality and aesthetics of your outdoor space.
At Strong Lock, we are here to help homeowners transform their landscapes & garden edges with durable and visually appealing retaining walls. So, contact us today and take the first step towards bringing your dream retaining wall to life.
Recent Comments